 |
Clipboardic v1.18
Clipboardic v1.18
A free, small utility that listen to clipboard activity, and auto-saves copied data into a Windows clipboard file (.clp).
Clipboardic is a small utility that listen to the clipboard activity, and each time that you copy something into the clipboard, it automatically save the copied data into Windows clipboard file (.clp). Later, when you need the copied data again, you can simply select the right clipboard file, and Clipboardic will automatically insert it into the clipboard.
Clipboardic also allows you to easily share the clipboard data between multiple computers on your local network.
System Requirements
Clipboardic works on any version of Windows, from Windows 2000 to Windows 11.
Changes
v1.18
Added option to choose another font (name and size) to display in the main window.
Using Clipboardic
Clipboardic doesn't require any installation process or additional dll files. In order to start using it, simply run the executable file - Clipboardic.exe
If you want to share the clipboard data in multiple computers on your network, you have to put Clipboardic.exe in a shared network drive, and then run Clipboardic.exe in all computers that you want to share the clipboard (you must run it from the same shared folder).
After running Clipboardic, the main window displays the list of available clipboard files. Each time that you copy something to the clipboard, a new item is added. If you run Clipboardic in multiple computers, you can see the clipboard files of all other computers, you can identify the file owner by looking in the 'Computer Name' column.
When you select a file in Clipboardic's main window, its content is automatically copied into the clipboard. If you have too much files in Clipboardic, you can use the 'Clear All My Clipboard Files' option.
Read more about using Clipboardic
Share clipboard between computers on your network
Translating Clipboardic to ... |
 |
597 |
May 09, 2024
Nir Sofer  |
 |
Core Temp v1.18
Core Temp v1.18
A compact, no fuss, small footprint, yet powerful program to monitor processor temperature and other vital information.
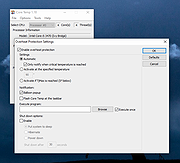
What makes Core Temp unique is the way it works. It is capable of displaying a temperature of each individual core of every processor in your system!
You can see temperature fluctuations in real time with varying workloads. Core Temp is also motherboard agnostic.
All major processor manufacturers have implemented a "DTS" (Digital Thermal Sensor) in their products. The DTS provides more accurate and higher resolution temperature readings than conventional onboard thermal sensors. (How does it work?).
This feature is supported by all recent x86 processors. Processors by Intel, AMD and VIA are supported. A complete list of supported processors is available.
Core Temp is easy to use, while also enabling a high level of customization and expandability.
Core Temp provides a platform for plug-ins, which allows developers to add new features and extend its functionality. You can find the plug-ins and add-ons here.
Core Temp Requirements:
Microsoft Windows XP, 7, 8, 10, 11, 2003 Server, 2008 Server, 2012 Server, 2016 Server.
Processor: Intel, AMD or VIA x86 based processor.
Changes:
v1.18 - 4th December, 2022
- New: AMD Zen 4, Zen 3 APU and Zen 2 APU support
- New: Intel Raptor Lake and Alder Lake support
- New: TDP, TjMax, multiplier range detection on desktop AMD Zen platforms
- Fix: Address the kernel-mode driver vulnerability/exploitation issues
- Fix: Redesign Bclk detection on all AMD platforms starting from the Phenom series
- Fix: Workaround the Bclk detection issues on Intel Skylake and newer series
- Fix: Bclk detection on older Intel platforms, utilizing x2Apic configuration
- Fix: Thread count on Intel hybrid architectures (Raptor/Alder Lake)
- Fix: Improve support for multiple older AMD and Intel processors
- Fix: Base multiplier detection on AMD Zen processors
- Fix: Incorrect temperature on AMD Zen processors (missing -49C offset)
- Fix: Engineering ... |
 |
3,686 |
Dec 09, 2022
Arthur Liberman  |
 |
WinUpdatesView v1.18
WinUpdatesView v1.18
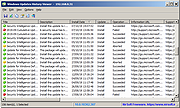
WinUpdatesView is a simple tool that displays the history of Windows updates on your system. WinUpdatesView can load the Windows updates history from your local system, using API, and it can also read and parse the Windows updates database file (DataStore.edb) from external drive or from remote computer on your network.
For every Windows update history record, WinUpdatesView displays the following fields: Title, Description, Install Date, Update Operation (Install, Uninstall, Not Started, In Progress), Operation Result (Succeeded, Succeeded With Errors, Failed, Aborted), Category, Information URL, Support URL, Uninstall Notes, Client Application ID, Service ID, Update ID, Revision Number, Unmapped Result Code, Server Selection, hResult
System Requirements
This tool works on any version of Windows, starting from Windows XP, and up to Windows 11. Both 32-bit and 64-bit systems are supported.
Changes:
v1.18
Added 'Sort By' toolbar button.
Start Using Windows Updates History Viewer
WinUpdatesView doesn't require any installation process or additional DLL files. In order to start using it, simply run the executable file - WinUpdatesView.exe
After running WinUpdatesView, it loads the Windows updates history from your local system, using API, and displays the information on the main window. You can select one or more items and then export them to csv/tab-delimited/HTML5/XML/JSON file (File -> 'Save Selected Items' or Ctrl+S ), or you can copy them to the clipboard (Ctrl+C) and then paste them to Excel or other application.
If you want to load the Windows updates history from another source (remote computer or external drive), go to the 'Advanced Options' window (F9) and choose the desired options.
Quick Filter
If you want to search a specific Windows update, simply press Ctrl+Q, and in the 'Quick Filter' window, type the string you want to find, and WinUpdatesView will instantly display the Windows updates contain the string you typed.
Getting Windows updates history from a ... |
 |
3,871 |
Sep 11, 2024
Nir Sofer  |


