|
AppCrashView v1.35
AppCrashView v1.35
AppCrashView is a small utility for Windows Vista, 7, 8 and 10 that displays the details of all application crashes occurred in your system. The crashes information is extracted from the .wer files created by the Windows Error Reporting (WER) component of the operating system every time that a crash is occurred. AppCrashView also allows you to easily save the crashes list to text/csv/html/xml file.
System Requirements
For now, this utility only works on Windows Vista, Windows 7, Windows Server 2008, Windows 8, and Windows 10. simply because the earlier versions of Windows don't save the crash information into .wer files. It's possible that in future versions, I'll also add support for Windows XP/2000/2003 by using Dr. Watson (Drwtsn32.exe) or other debug component that capture the crash information.
Versions History
Version 1.35
Added 'Quick Filter' feature (View -> Use Quick Filter or Ctrl+Q). When it's turned on, you can type a string in the text-box added under the toolbar and AppCrashView will instantly filter the application crashes list, showing only lines that contain the string you typed.
Using AppCrashView
AppCrashView doesn't require any installation process or additional dll files. In order to start using it, simply run the executable file - AppCrashView.exe
The main window of AppCrashView contains 2 pane. The upper pane displays the list of all crashes found in your system, while the lower pane displays the content of the crash file that you select in the upper pane.
You can select one or more crashes in the upper pane, and then save them (Ctrl+S) into text/html/xml/csv file or copy them to the clipboard ,and paste them into Excel or other spreadsheet application.
Command-Line Options
/ProfilesFolder <Folder> Specifies the user profiles folder (e.g: c:\users) to load. If this parameter is not specified, the profiles folder of the current operating system is ... |
 |
5,411 |
Jan 05, 2020
Nir Sofer 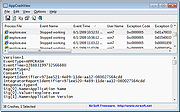 |
|
NetRouteView v1.35
NetRouteView v1.35
NetRouteView is a GUI alternative to the standard route utility (Route.exe) of Windows operating system. It displays the list of all routes on your current network, including the destination, mask, gateway, interface IP address, metric value, type, protocol, age (in seconds), interface name, and the MAC address.
NetRouteView also allows you to easily add new routes, as well as to remove or modify existing static routes.
Notice: Currently, this utility doesn't support IPv6.
System Requirements
This utility works on any version of Windows, starting from Windows 2000, and up to Windows 10.
Version 1.35:
When you add a new route, the new dialog-box is filled with the values you used in the previous time.
When you add a new route, NetRouteView now automatically fills the lowest metric value on your system.
Using NetRouteView
NetRouteView doesn't require any installation process or additional dll files. In order to start using it, simply copy the executable file (NetRouteView.exe) to any folder you like, and run it.
The main window of NetRouteView displays the list of all your network routes, like the 'print' command in the route utility of Windows. You can select a single route and then delete it (Del key) or modify it (Ctrl+M). Be aware that only routes with 'Static Route' value in the Protocol column, can be deleted or modified. You can also add a new route by using 'New Route' option (Ctrl+N).
Notice: If you are using NetRouteView on Windows 7/Vista/2008 with UAC turned on, you must right-click on NetRouteView.exe and choose 'Run As Administrator' in order to be able to add, remove, or delete network routes.
Using The 'Switch Metric Values' Option
If you have more than one network adapters with Internet connection, the 'Metric' value is used to determine which Internet connection will ... |
|
3,310 |
Oct 20, 2020
Nir Sofer  |
|
NetworkInterfacesView v1.35
NetworkInterfacesView v1.35
Show info on all network adapters and allows disabling and enabling them.
NetworkInterfacesView is a simple tool that displays the list of all network adapters/interfaces installed on your system. It displays network interfaces that are currently active, as well as network interfaces that have been installed previously, and now they are not connected (like USB wireless network adapters).
For every network interface found on your system, the following information is displayed (if it's stored in the Registry): Device Name, Connection Name, IP Address, Subnet Mask, Default Gateway, DHCP Server, Status, MAC Address and more...
You can select one or more network interface items and then export them to xml/html/csv/tab-delimited file, or copy them into the clipboard and then paste them into Excel or other spreadsheet application.
System Requirements
This utility works on any version of Windows, starting from Windows 2000 and up to Windows 11. Both 32-bit and 64-bit systems are supported.
Changes:
v1.35
Added IPv6 addresses and IPv6 DNS servers.
Start Using NetworkInterfacesView
NetworkInterfacesView doesn't require any installation process or additional DLL files. In order to start using it, simply run the executable file - NetworkInterfacesView.exe
After you run NetworkInterfacesView, the main window displays the list of all network interfaces found in the Registry of your system. You can select one or more items, and then export them to xml/csv/tab-delimited/html file by using the 'Save Selected Items' option (Ctrl+S). You can also copy the selected items into the clipboard (Ctrl+C), and then paste them into Excel or other spreadsheet application.
Command-Line Options
/disable <Name1> <Name2> <Name3>... Disables the specified network adapters. You can specify the Interface GUID, the connection name , and the device name. For example:
NetworkInterfacesView.exe /disable "Local Area Connection"
NetworkInterfacesView.exe /disable {1BC6B2D1-1606-3029-256F-2EB709923499} {F430061F-D117-29C0-B1A9-F11D473AD7CE}
/enable <Name1> <Name2> <Name3>... Enables the specified network adapters. You can specify the Interface GUID, the connection name , and the device name.
/DisableEnable <Name1> ... |
|
4,564 |
Mar 26, 2024
Nir Sofer 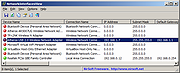 |
|
NTFSLinksView v1.35
NTFSLinksView v1.35
Shows a list of all symbolic links and junctions in a specified folder, and their target paths.
It also allows you to save the symbolic links/junctions list into text/html/xml/csv file.
Starting from Windows Vista, Microsoft uses symbolic links and junction points of NTFS file system in order to make changes in the folders structure of Windows and keep the compatibility of applications written for older versions of Windows.
Using NTFSLinksView
NTFSLinksView doesn't require any installation process or additional dll files. In order to start using it, simply run the executable file - NTFSLinksView.exe
When you run NTFSLinksView, press the Go button, and then the main window will display the list of all NTFS symbolic links/junction points in your profile folder. If you want to view the NTFS links in other folders, simply type the folder path in the top text-box and press enter (or click the 'Go' button).
If you want to scan your entire drive, type 'C:\' in the folder text box and choose Infinite subfolder depth.
Supported operating systems:
Windows Vista, 7, 8, 10 and 11.
Changes:
v1.35:
Added 'Open Item Folder' option, which opens the folder where the symbolic link or junction point is located.
License
This utility is released as freeware. You are allowed to freely distribute this utility via floppy disk, CD-ROM, Internet, or in any other way, as long as you don't charge anything for this. If you distribute this utility, you must include all files in the distribution package, without any modification.
Disclaimer
The software is provided "AS IS" without any warranty, either expressed or implied, including, but not limited to, the implied warranties of merchantability and fitness for a particular purpose. The author will not be liable for any special, incidental, consequential or indirect damages due to loss of data or any other reason.
Feedback
If you have any problem, ... |
|
3,628 |
Jul 08, 2024
Nir Sofer  |
|
QuickSetDNS v1.35
QuickSetDNS v1.35
Quickly set DNS servers of your Internet connection on Windows.
QuickSetDNS is a simple tool that allows you to easily change the DNS servers that are used for your Internet connection. You can set the desired DNS servers from the user interface, by choosing from a list of DNS servers that you defined, or from command-line, without displaying any user interface.
System Requirements
This utility works on any version of Windows, starting from Windows 2000 and up to Windows 11. Both 32-bit and 64-bit systems are supported.
Changes
Version 1.35:
Updated to work properly in high DPI mode.
Added toolbar button for the 'Set Active DNS (IPv4+IPv6)' option.
Added 'Double-Click Action' (Under the Options menu), which allows you to choose what to do when you double-click an item: None, Edit DNS Server, Set Active DNS (IPv4), Set Active DNS (IPv4+IPv6), Open Adapter In RegEdit, Properties.
Added 'Enter Key Action' (Under the Options menu), which allows you to choose what to do when you press the Enter key: None, Edit DNS Server, Set Active DNS (IPv4), Set Active DNS (IPv4+IPv6), Open Adapter In RegEdit, Properties.
Start Using QuickSetDNS
QuickSetDNS doesn't require any installation process or additional dll files. In order to start using it, simply run the executable file - QuickSetDNS.exe
After running QuickSetDNS, the main window allows you to easily choose the desired DNS servers to use on your Internet connection, by using the 'Set Active DNS' option (F2). By default, QuickSetDNS provides only one alternative: the public DNS servers of Google - 8.8.8.8 and 8.8.4.4
You can easily add more DNS servers to the list by using the 'New DNS Server' option (Ctrl+N).
If the 'Automatic DNS' option is selected, then the DNS server information is received from your router ... |
|
5,363 |
Sep 15, 2023
Nir Sofer 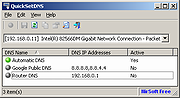 |
|
WebCacheImageInfo v1.35
WebCacheImageInfo v1.35
Display images information stored in Web browser cache.
WebCacheImageInfo is a simple tool that searches for JPEG images with EXIF information stored inside the cache of your Web browser (Internet Explorer, Firefox, or Chrome), and then it displays the list of all images found in the cache with the interesting information stored in them, like the software that was used to create the image, the camera model that was used to photograph the image, and the date/time that the image was created.
System Requirements And Limitations
• This utility works in any version of Windows, starting from Windows XP and up to Windows 11. Both 32-bit and 64-bit systems are supported.
• The following Web browsers are supported: Internet Explorer, Mozilla Firefox, SeaMonkey, and Google Chrome. Opera is not supported because it stores the JPEG images in Webp format.
• WebCacheImageInfo won't work if you configure your Web browser to clear the cache after closing it.
• It's recommended to close all windows of your Web browser before using WebCacheImageInfo, to ensure that all cache files are saved to the disk.
• Be aware that WebCacheImageInfo only displays JPEG images with EXIF information stored in them. It doesn't display other images stored in the cache of your Web browsers.
Changes:
v1.35:
Updated to read the cache files of the latest Chrome version.
Start Using WebCacheImageInfo
WebCacheImageInfo doesn't require any installation process or additional DLL files. In order to start using it, simply run the executable file - WebCacheImageInfo.exe
After running it, WebCacheImageInfo begins to scan the cache of your Web browser and displays every JPEG image with EXIF information found inside the cache. You may need to wait up to a few ... |
|
8,790 |
Oct 03, 2024
Nir Sofer 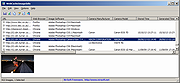 |
|
WhatInStartup v1.35 32bit
WhatInStartup v1.35 32bit
This utility displays the list of all applications that are loaded automatically when Windows starts up. For each application, the following information is displayed: Startup Type (Registry/Startup Folder), Command-Line String, Product Name, File Version, Company Name, Location in the Registry or file system, and more.
It allows you to easily disable or delete unwanted programs that run in your Windows startup. You can use it on your currently running instance of Windows, as well as you can use it on external instance of Windows in another drive.
WhatInStartup also supports a special "Permanent Disabling" feature - If a program that you previously disabled added itself again to the startup list of Windows, WhatInStartup will automatically detect the change and disable it again.
System Requirements
This utility works on any version of Windows starting from Windows 2000 and up to Windows 8. Both 32-bit and 64-bit systems are supported.
Versions History
Version 1.35:
Added 'Auto Size Columns+Headers' option.
Added x64 build.
Using WhatInStartup
WhatInStartup doesn't require any installation process or additional dll files. In order to start using it, simply copy the executable file (WhatInStartup.exe) info any folder you like, and run it.
After running it, the main window of WhatInStartup displays the list of all programs that are loaded at Windows startup. You can select one or more items, and then disable them (F7), enable them back after previously disabled (F8), delete them (Ctrl+Delete), or save them into text/csv/html/xml file (Ctrl+S).
Permanent Disabling
Permanent Disabling is a special feature of WhatInStartup that allows you to Permanently enforce the disabling of programs in Windows startup.
Many programs add themselves into the Windows startup list without even asking you, and even if you disable or delete them, these programs add themselves ... |
|
5,353 |
Jan 13, 2017
Nir Sofer 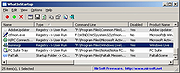 |
|
WhatInStartup v1.35 64bit
WhatInStartup v1.35 64bit
This utility displays the list of all applications that are loaded automatically when Windows starts up. For each application, the following information is displayed: Startup Type (Registry/Startup Folder), Command-Line String, Product Name, File Version, Company Name, Location in the Registry or file system, and more.
It allows you to easily disable or delete unwanted programs that run in your Windows startup. You can use it on your currently running instance of Windows, as well as you can use it on external instance of Windows in another drive.
WhatInStartup also supports a special "Permanent Disabling" feature - If a program that you previously disabled added itself again to the startup list of Windows, WhatInStartup will automatically detect the change and disable it again.
System Requirements
This utility works on any version of Windows starting from Windows 2000 and up to Windows 8. Both 32-bit and 64-bit systems are supported.
Versions History
Version 1.35:
Added 'Auto Size Columns+Headers' option.
Added x64 build.
Using WhatInStartup
WhatInStartup doesn't require any installation process or additional dll files. In order to start using it, simply copy the executable file (WhatInStartup.exe) info any folder you like, and run it.
After running it, the main window of WhatInStartup displays the list of all programs that are loaded at Windows startup. You can select one or more items, and then disable them (F7), enable them back after previously disabled (F8), delete them (Ctrl+Delete), or save them into text/csv/html/xml file (Ctrl+S).
Permanent Disabling
Permanent Disabling is a special feature of WhatInStartup that allows you to Permanently enforce the disabling of programs in Windows startup.
Many programs add themselves into the Windows startup list without even asking you, and even if you disable or delete them, these programs add themselves ... |
|
5,379 |
Jan 13, 2017
Nir Sofer |